Blog Archives

Dress For Sewing

FacebooktwitterredditpinterestFacebooktwitterredditpinterest

Not quite what you think! Not a dress to sew but a question, do you dress for sewing? Do you prepare yourself mentally?
dress for sewingIn the 40s and 50s, a woman’s place was very much in the home and there were lots of articles and advice on how a housewife should comport herself.

Some of the advice from this Singer sewing manual made me laugh, but there are a couple of useful tips in there!


Mentally prepare yourself for sewing


Tprepare mentally for sewinghe Singer manual advises “never approach sewing with a sigh or in a lackadaisical manner. Good results are difficult when indifference predominates.” Well, I guess if you’re sighing and viewing it as a chore you’re not really going to produce your best work! If I feel like this about a sewing project then I’ll change the project to something I enjoy doing. If I do have to do a particular project then I’ll put myself in the mood by playing some upbeat music and thinking about how I’ll feel when it’s finished (prepare myself mentally). Does some lively music put you in the mood for sewing?

Do the Housework

do the choresCan you concentrate if you have a sinkful of dirty dishes or unmade beds?
I can live with unmade beds, dirty dishes annoy me so I would do these! According to the Singer advice, your mind can be “free to enjoy sewing if all the household chores are done.” It depends what they mean by household chores. A bit of dust here and there, carpets unvacuumed, bath not cleaned? I could sew quite happily without giving these “chores” a second thought!

Dress for Sewing


The advice from Singer is to “make yourself as attractive as possible.”  What does this statement mean to you, full makeup, best dress, killer heels? I don’t think I’d get much work done dressed like that! The reasoning behind this is that you’ll be distracted from your sewing if you are not “neatly put together.” You’d be fretting in case your husband came home or you got unexpected visitors. You are also advised to have some french chalk close by to dust your fingers occasionally, (it doesn’t say why!).

Things have changed a lot since those days! So how do you dress for sewing? Do you care if you’re not “neatly put together?” Does the housework have to be done, including unmade beds? I’d love to hear your stories, please leave comments below!


FacebooktwitterredditpinterestFacebooktwitterredditpinterest

How to Patchwork Quilt – Part 3

FacebooktwitterredditpinterestFacebooktwitterredditpinterest

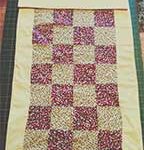
We finished How to Patchwork Quilt – Part 2 with the patchwork completed and now it’s time to move onto the quilting part.

There are many different ways to make a quilt but, for the purpose of this tutorial I’m doing it the simplest way.

Making the quilt.

A quick note here….3 layers of patchwork quiltI decided to add a cream strip along the top of the patchwork, (about 15/16 cm), the idea being I can embroider the baby’s name in the corner once he/she’s born.

Lay the batting/wadding on the bottom, then the patchwork facing up, then the backing.


Sew around 3 sides Open End of patchwork quiltleaving the top open. Trim the seam then turn right sides out leaving the batting in the middle.


Time to get the iron Patchwork quilt ironedout again! Turn the open edges in and give the quilt a good press. Top stitch all the way around the edge. You can use a contrasting thread colour for this, I kept it white as I don’t know whether it’s for a boy or girl.


Quilting.

As with the joining of the pieces, there are many different methods and patterns for the quilting part. You can see some elaborate examples in How to Quilt – Part 1

A lot will depend on the machine Patchwork quilt squareyou have and the thickness of the quilt. My sewing machine isn’t a quilting machine so I chose a simple straight machine stitch criss-crossed over a 4×4 square. Again I kept the white thread. It’s hard to see in the image but hopefully you get the idea.


Another press and finished! How to patchwork quilt finishedThis was the easiest patchwork quilt I could make, it’s a new skill for me to learn so always best to start simple! It’s not perfect, there are some “wobbly” bits but for a first attempt I’m pleased with it.


Finally.

I enjoyed the process and some of the examples I saw in my research have inspired me to do more. Proper quilting rulers would have made cutting the patchwork pieces easier. If you want to learn more about quilting and the best tools to us, take a look at this site.

FacebooktwitterredditpinterestFacebooktwitterredditpinterest

How to Patchwork Quilt – Part 2

FacebooktwitterredditpinterestFacebooktwitterredditpinterest

In How to Patchwork Quilt – Part 1 we finished by having fabric squares prepared ready for piecing together.

How to Patchwork Quilt Part – 2

Lay out your squares in How to patchwork quilt squaresthe pattern you want. I decided to put the cream squares down the sides, I liked the look of it better.


We’ll sew the squares together How to patchwork quilt Sew Squaresone strip at a time. Take the first 2 squares and sew right sides together, then sew the next square on in the order you laid them out.


Keep adding the squares till How to patchwork quilt stripsyou have the first strip finished. Continue with each row of squares until you have all the rows sewn.


This is where you’ll see how Inaccurate cut squaresaccurate your square cutting was. You can see quite clearly in the picture on the right that my squares weren’t all created equally! I unpicked this particular block and cut another square of fabric.

I thought I was being careful and accurate when I cut out the squares so perhaps I need one of those special quilting rulers mentioned in How to Patchwork Quilt – Part 1….

After redoing that strip it was Patchwork Quilt pressed seamtime to trim the seams, switch the iron back on and press them open.


Join the strips.

Pin the strips, right sides Pin patchwork at seamstogether. I pinned right on the seams to make sure the seams lined up when sewing. (Click on the image to see full size).


All patchworked strips pinned


Sew all the strips together trying Patchwork Finishedto keep the seams aligned. Once you have all the strips sewn, trim and press.

You should now have a complete piece of patchwork!


Keeping the seams aligned Patchwork finishedwas the most challenging part. I’m sure this is one of those things where practice makes perfect. If you click to see the full size image you can see where my seams aren’t aligned perfectly but I’m pleased with what I’ve achieved so far.


How to Patchwork Quilt – Part 3 will cover making the quilt using the patchwork made in Parts 1 and How to Patchwork Quilt – Part 2. You’ll also have the opportunity to disguise mistakes made in the patchwork!

If you’ve any questions or comments about this tutorial please leave a comment below or contact me, I’d love to hear from you!

FacebooktwitterredditpinterestFacebooktwitterredditpinterest

How to Patchwork Quilt

FacebooktwitterredditpinterestFacebooktwitterredditpinterest

I don’t know how to patchwork quilt so take this journey with me and we’ll work together to create a patchwork pram quilt. I have another Grandbaby on the way and thought this would make a great gift. There are plenty of tutorials and advice, I’ve already done my research, and am ready to get started!

I’m going to do this ‘How to patchwork quilt’ tutorial in 3 parts. This will give us time to complete each part before moving onto the next.

I have the materials that I need having taken advantage of the special offer from Hobbycraft (see here) and buying the half price fat quarters (Fat quarters are usually 56cm wide x 50cm, (22 inches x 18 inches)). I’m using an unwanted quilt cover for the backing and some of the patchwork squares.

What is a Patchwork Quilt?

A quilt is described Elaborate Quiltas being a type of blanket composed of three layers. A top layer, a layer of batting or wadding in the middle and a fabric back. Quilting is where the layers are stitched together with either simple or very elaborate patterns. (Image “Russellquiltera” by Russell Lee Courtesy of Wikipedia)

Patchwork is described as simple patchworkneedlework that involves sewing geometric pieces of fabric together to form a large piece. Generally the larger piece is based on repeating patterns built up with the fabric shapes. The simplest form is squares, which you can see in this image.


So, a patchwork quilt is using the pieced patchwork to form the top layer of your quilt.

Of course, there is much Elaborate quiltmore to this kind of sewing. There are some beautiful examples like the picture on the right. (“Korea-Joseon-Bojagi-01” by by angela n.)

I’m keeping it simple for my first attempt by using a basic square patchwork.


Lets get started.

Based on an existing pram cover I’ve decided to make my pram quilt 61cm x 81.4cm (24″ x 32″) with each square being 10cm (4″)

If I’ve done my calculations correctly that means I’ll need 48 squares. There’ll need to be a seam allowance added so I’ll add 1.27cm (1/2″) to each square.

Materials.

  • A piece 61cm x 81.4cm (24″ x 32″) How to quilt materialsfor the backing.
  • A piece of wadding/batting 61cm x 81.4cm((24″ x 32″).
  • Colourful fabric for cutting the squares. I’m using two of the fat quarters mentioned earlier plus a one fat quarter cut from the backing. So that’s three fat quarters.
  • Rotary cutter and self-healing mat (optional, you can use scissors).

Instructions.

The next step is vey important; IRON YOUR FABRIC! For accuracy when sewing the squares together this needs to be done. You’ve cut out your backing and wadding piece so now it’s time to cut out the squares. There are special patchwork and quilting rulers for this, like this one here Sew-Easy Patchwork Quilting Ruler 24×6-1/2in. I don’t have one of these so I’m going to mark out the squares with tailors chalk and a mitred ruler.

Lay the three fat quarters on top of each Fabric choiceother and mark out 48 x 11.27cm (4.4″)squares.


Measuring the squares


Once you have all the squares Fabric Squares Cut outmarked out it’s time to start cutting. Cut along the long length first. You’ll then have 4 separate lots of fabric. Cut along the markings you made earlier to form the squares.

You should now have 48 neatly cut squares ready to start forming the patchwork.


The next step is to lay out the squares in the pattern you want to sew them. That will be covered in Part 2 of How to Patchwork Quilt.

I’m really enjoying learning and will definitely want to do more patchwork quilting. I found this great resource where you can download all the quilting patterns you want – it’s FREE!

If you have any questions or comments about this tutorial please comment below or contact me.


FacebooktwitterredditpinterestFacebooktwitterredditpinterest